[identity profile] lafarat.livejournal.com
Lolita purses are lovely things, but if there's one thing they lack, it's space. Some struggle to hold wallets and car keys, and some can barely choke down credit cards and some coins, so you can forget entirely about laptops. I have been searching for years now, in vain, for a loliable laptop bag. There are plenty of lovely leather suitcases at the thriftshop where I work, and I am not at all against modifying one, but all of them are very utilitarian looking. How do you spice up the appearence of a leather briefcase to make it look more suitable? I doubt slapping lace on it would work.
[identity profile] j9isawesome.livejournal.com
Waist ties are great, for some people. They can be a blessing if your dress or skirt is too big without them, or just add a cute extra bit of flair to your finished look. But if you’re like me and find waist-ties to be more hassle than they’re worth, never wear them, and regard them as something to carefully tuck away in your closet in case you ever want to resell that dress or skirt- then this tutorial might be for you. I got fed up with my waist ties just lying around, but didn’t want to damage them in any way, and came up with this quick and easy way to turn them into temporary accessories.


Two tutorials with lots of pictures )
[identity profile] shirayukin.livejournal.com
Hello, everyone!

Many years ago, when I started liking Lolita, the most fun part of EGL for me were the crafts and how-tos. I kind of miss that!
So I thought of sharing these simple accessories tutorials with the community.

Clicking the picture of the item you want to make will take you to the corresponding post on my blog.

JabotbowHair Corsage
Hope you guys enjoy these! (:
[identity profile] growpower.livejournal.com
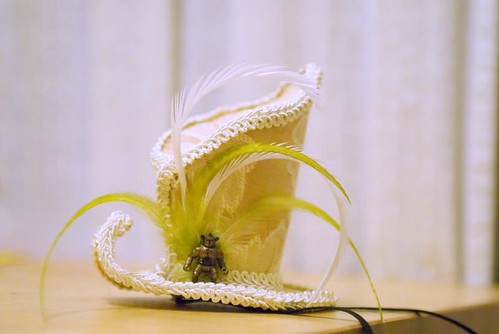
Hi guys:  I made a tutorial for making your own tophat.  Thought you might like it.

http://www.hungrypanda.net/blog/2011/01/asymmetric-mini-tophat-fascinator-tutorial/

tophat
[identity profile] nekusagi.livejournal.com
I was poking around on some recently followed tumblrs and found a link to this awesome book purse tutorial.

It looks like something that would work great with classic or Gothic Lolita, and much more affordably than the IW book purse.
[identity profile] monchdroof.livejournal.com

 I know I'm a few months late on the theme, but I wanted some feedback on a bonnet I made! For kicks, it is in tutorial format, so if any of you lovely lolis want to try and make your own (or have opinions on how to improve my own crafting!) you are certainly welcome to use this tutorial :)
                                 WARNING
 ~~**~~**~~**VERY PICTURE HEAVY!**~~**~~**~~


Tutorial behind cut! )
[identity profile] t3h-janitor-jim.livejournal.com
I recently received the magazine featured in an ad in the "Gothic & Lolita Bible: Ensemble" (Cover is in this post). If you don't understand any Japanese, I must say that the cover is rather misleading. A friend told me it's like seeing a Playboy magazine with Carmen Electra on the cover and the inside is filled with Rob Schneider.

I scanned the parts of the magazine that would be relevant and helpful to this community.

Preview and fullsize download link )
[identity profile] poppy-cake.livejournal.com
 with real life pictures... well sort of, I kind of drew them.  
try it for yourself! )Read more... )
[identity profile] shinnyneko.livejournal.com

From the moment I saw Angelic Pretty's "Tricky Night" line of halloween jewelry, I loved it. Sadly, not only was it WAAAAYY out of my price range, the moment I saw it was more then a few moments too late. "SOLD OUT"  nooooooooooooo TT_____TT

That's when I got crafty. I was casually browsing randomness on google and came across this tutorial for shrink plastic rings. [Brain gears turn] Heey, I bet I could apply that technique to bangles. A little bit of trial and error later I came up with this--


+10 )
[identity profile] evilcatsterer.livejournal.com
I made a post a while back, asking if anyone had ever customized their RHSs, and getting a few "No I haven't, but I'd like to see pics!" in response.
I bought a pair of wooden RHSs from someone online (off-brand, used once or twice before I got them). I was all over them because they were an excellent price, and they were actually my size (having bigger feet SUCKS). My biggest problem with them was that they were white, and I hardly wear anything that I can wear white shoes with, but, given the price, I figured I'd buy them and change that! I followed the tutorial linked here for the base part of the shoes (mostly, anyway).


Cut for pics and the process! )

Update! I wore these for a few hours a couple days after I posted this, and went to put them on a few days afterward and the paint is cracking already! See this post! Apparently I'm not the only one who has had this problem, and some people recommended respraying the shoes. I myself, because the soles are wood and already have dripped paint on them and I don't want more than what's already there, I probably won't respray them. Just a warning to anyone else who sprays their shoes, they'll probably crack after not much time, be prepared to respray!
[identity profile] beata-beatrixx.livejournal.com
So, I've been interested in making bonnets for awhile now, but couldn't seem to a) figure it out or b) afford it. But as I have returned to this effort for a creative project for college, I did a search and found this really cool bonnet making tutorial for making a classic-style bonnet out of a cheap straw hat--sewing optional. I plan on trying it when I get the funds/drive time, but I thought I'd share it with you since the results (as seen below) are quite lovely!:

tutorial here.

If this has been posted before(checked the memories and didn't see it), please feel free to delete.
[identity profile] customcosplay.livejournal.com
Edit: if anyone else tries it, post what you make! I'd love to see the results! ^__^

I though people might be interested in this, it is really simple to make your own cute bag out of a stuffed toy and a few basic sewing notions. I will be cross-posting this to Sew-loli and Lolita crafts, sorry if you get sick of seeing it!

Also, please let me know if anything isn't clear, it is always hard to tell if I am writing good instructions, since I already know what I am doing!

If you haven't set a zipper before, you may want to try this pocket before trying my tutorial: http://www.craftster.org/forum/index.php?topic=22875 so you have a bit of an idea where you are going ;)

[identity profile] closetvictorian.livejournal.com
Attention, crafty lolitas!

I was browsing around for cheap Christmas decoration ideas, and came across a tree skirt project, made of velvet, with an embossed border. I don't post regularly to this site anymore, but when I saw this I immediately thought, "What a gorgeous Loli skirt that would make!"

I know that some you here are the crafty sort, like me, who make most of your Loli clothing. And since the basics for making a proper Lolita skirt is already in the memories, I present to you all my amazing find:

http://www.hotpotatoes.com/velvet.asp

I'm going to try it on something small first, like a pillow, before I would try it on a skirt, but I just had to share this link right when I found it.
[identity profile] emiko.livejournal.com
Ok, lots of people have been asking about stenciling, screenprinting, and spraypainting images onto fabrics and stuff, so I figured I'd go and explain them all. First I'll go with stenciling/spraypainting.

Stencils )
[identity profile] stilista.livejournal.com
Because user [livejournal.com profile] bejipan requested a tutorial for her site, I decided I'll put the steps here.

[livejournal.com profile] bejipan - You are welcome to put this on your site, along with any of the pictures I included in my post. If you need any other pictures, just let me know and I can get them for you.
Credit to me [livejournal.com profile] sailormoonx would be nice. My name is Lauren. And uhm I think that's it! :)

If you have any questions about what I used or how I did it, feel free to ask.

Tutorial under cut )
[identity profile] animeangelblue.livejournal.com
Someone asked how to do this in a previous post, so I took some pictures and decided to go step by step ^_^

Ribbon Roses w/Pictures )

Sorry if this is off topic or too large a post ^_^
[identity profile] weetziefae.livejournal.com
I found this while surfing DIY sites today. I have NOT tried it....yet Giggles

Parasol


Get an old umbrella with a good sturdy structure. The fabric part of it only has to be in quasi good shape (that's your pattern) make sure it's one of the ones with the little metal caps on the end that come off. Make sure all of those are still attached too.

Take the fabric part off. Try not to tear it. Take it off gently, and cut small slits in it around the top part, if necessary to get it off. Carefully get the little metal cap things off and put them aside. You want to be able to use them later.

Pin the old top to the fabric (use something that isn't too stretchy, or not at all). Cut the new top out carefully, leaving at least an inch around the edge for the "hem." Where the center is, cut out the absolute smallest hole necessary to get the top thingy through, too small is better than too big.

Hem the edge so it will fit. Put it through the center thingy, sew it in if necessary (this will be a little tricky). Clean all the old fabric and glue out of the end caps (make sure your fabric isn't so thick they won't fit on) and presto. If you were really careful with your pining and cutting and hemming (oh my!), you should have a parasol.

Profile

egl_archive: (Default)
egl_archive

January 2026

S M T W T F S
    1 23
45678910
11121314151617
18192021222324
25262728293031

Syndicate

RSS Atom

Most Popular Tags

Style Credit

Expand Cut Tags

No cut tags
Page generated May. 26th, 2026 07:32 am
Powered by Dreamwidth Studios